Sunday 28 August 2016

Friday 26/08/16

Another week on the Elddis Shamal caravan restoration has went by and this week I have mainly concentrated on finished the painting of the walls and the internal doors of the caravan, I have also designed, made and fitted the caravan internal cupboard door handles using some material that I has lying about my shed and by using some parts from the old door handles. I have also rewired the 12 volt water pump system inserted a new basin that I purchased from Motherwells local pound shop that will have attached a waste disposal system.

The caravan will eventually have a new running water system installed under the main kitchen unit I will also be installing a new water Jerry can that will hold 20 liters of fresh water that cab  be pumped via the reconditioned water pump that I managed to obtain from a local scrap yard.


Thursday 18 August 2016

Friday 12/08/16

Friday 12/08/16

Another week has went by on my Eldiss caravan restoration and a few more changes and ideas have taken place. My main time has been spent removing the damp wall at the front of the van, painting and carrying work  out on the 12 volt supply solar power system that I have installed.

I rewired my original board and made some changes to the layout of both solar power controllers that both give the same readings of the power when the sun is out and that is passed through the controller units that recharge the battery, both are read 12.5 volts on the digital display units .

The next step is to install ampere meter, paint the cupboard, identify the solar panels 1 and 2 and hide any other cables that can be seen.

I have also removed some damp rotten fixtures arround the caravans main window frame, I have used 2ml ply wood as I found this flwxi enough to fit and fold into place where needed.

New wall completed and rear window resealed


The clamps seen in this photograph have been extremely helpful when gluing the new walls in place


This week as the weather has been very good I removed the skylight frame washed, cleaned and resealed the unit from the out side and the in side, hopefully it will be water tight for the winter


I also removed the old kitchen unit doors sanded and painted with a green under coat.


In the top right of this picture I am planning to install a small sink with pump and a water storage tank underneath 


In this space I am planning to install a small microwave instead of a gas cooker


Friday 19/08/16

Friday 12/08/16

Another week has went by on my Eldiss caravan restoration and a few more changes and ideas have taken place. My main time has been spent removing the damp wall at the front of the van, painting and carrying work  out on the 12 volt supply solar power system that I have installed.

I rewired my original board and made some changes to the layout of both solar power controllers that both give the same readings of the power when the sun is out and that is passed through the controller units that recharge the battery, both are read 12.5 volts on the digital display units .

The next step is to install ampere meter, paint the cupboard, identify the solar panels 1 and 2 and hide any other cables that can be seen.

I have also removed some damp rotten fixtures arround the caravans main window frame, I have used 2ml ply wood as I found this flwxi enough to fit and fold into place where needed.

New wall completed and rear window resealed


The clamps seen in this photograph have been extremely helpful when gluing the new walls in place


This week as the weather has been very good I removed the skylight frame washed, cleaned and resealed the unit from the out side and the in side, hopefully it will be water tight for the winter


I also removed the old kitchen unit doors sanded and painted with a green under coat.


In the top right of this picture I am planning to install a small sink with pump and a water storage tank underneath 


In this space I am planning to install a small microwave instead of a gas cooker


Friday 12 August 2016

Friday 12th August Update


Instead of writing new individual page listings of all the work that I have carried out I've decided just to have a weekly update on the work that I have carried out on the van so here is week 1 report.

It's Friday the 12th of  August  2016 and it's chucking it down outside and I am sitting in the van listening to the rain battering off the caravan roof, some how i feel completely relaxed typing up my report/blog.

Since my last photographs I have made some internal cosmetic changes to the van. The van now looks cleaner brighter, fresher and more modern with the paint work and repairs I have carried out, even my neighbor popped into see the changes that I have made.


We have have had a few arguments about what the colour scheme should be for the van. I wanted to keep the early 80s wood affect look but Joanne wanted nice bright colours and to be honest I think she has chosen the correct colours as i think the van looks pretty good.

All the origanal electrical system was removed from the van by the previous owner I have had to install a new electrical system that will run off the 12 volt leisure battery and the solar panels that I have installed. The solar panels will charge the battery slowly and the control panel should protect the battery from a complete discharge.

I have chosen LED strip lights simply because they are cheap to buy easy to install and they do not use a lot of power to run approx 1.1 amps. The LED's have sensors and can be operated by the remote control. The whole lighting system COST no more than £50.00 that includes the solar panel and some extra wiring that I to fit.

I also have plenty of LED's left over which I will use to light my man shed for the up and coming winter.


In this photograph you can see the LED light changes and also the 2nd hand cushions that I  bought
for £30.00 


I have set up a small control panel for the led lights, solar panels and the battery smart charger. I dont think my 2nd hand battery is holding a charge it's a 60 amp hour leisure battery I only paid £20.00 for it but a lesson has been learned I should have bought new one!!!!

The power drops very quickly from the battery when its not in use 14 volts to 10 volts within minutes of the charger being turned off.


My DIY Power board that still needs painted and the cables tidied up.
12 Volt Smart Charger
Voltage and AMP meter that I installed above the ZIG Control panel


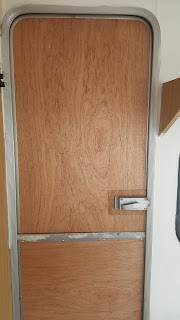
I have also repaired the damaged door by removing and replacing the rotten panels using the old panels as templates and sealing all the joints that were previously letting water in.